If you learn to work with Cobalt templates the unlimited possibilities will open before you. Everyone who understand it’s simple concept goes banana. Everything they can say is:
WOW! Now I can do everything!
But, you have to learn it first. And this may take time. But we will help you to go through. ANd even if you get questions along your project, that are not answered in this article we will help you and answer any of them in our support forum.
Cobalt templates is the system that allow you to set different rendering templates or styles to each section or content type.
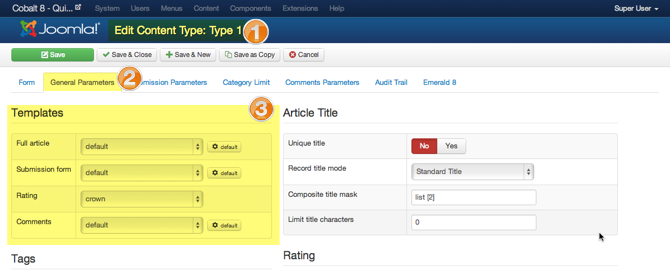
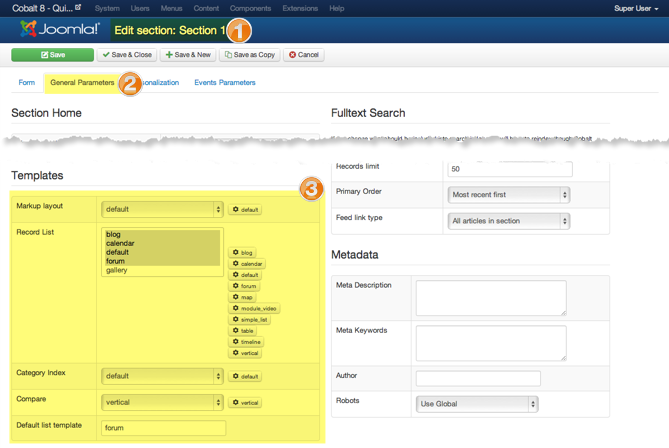
With this approach every section, article, comment or other display block of Cobalt may looks differently. At the same time all your changes will be preserved on updates of extension itself.
The small gear button allows you to set template settings. This also allow you to create highly customizable templates.
You do not have to be an expert to manage this. Although the better expert you are in CSS/HTML the better templates will come out of your hands.
By elementary level I mean that you can understand that this
<h2><?php echo $item->title; ?></h2>
Simply shows article title. If this is not difficult for you you can continue reading.
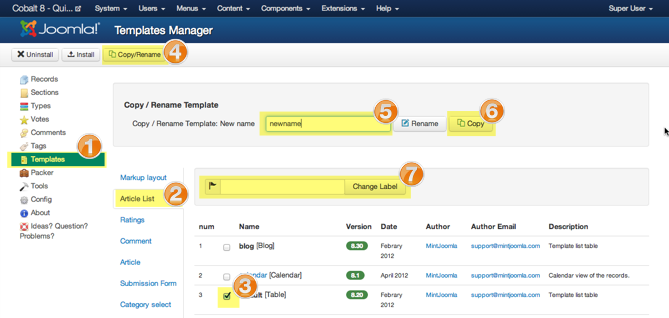
To starting developing any template you start with making copy of some existing template. This is very important step to prevent losing changes on the next Cobalt update.
Open Cobalt template manager.
Choose template that feets your need the most. Usually there is only one default template by default, but there are few for record lists and category indexes. If you need table style template copy deafult. If you need more like blog style template copy simple_list.
Click Copy/Rename button in toolbar.
Enter your new name and click Copy button.
After reload you will see your new template in the list.
If you copy Article List template, you need also change template name. Because this name later may be used in template switcher on frontend if you use more than 1 template per section. Enter name into Change Label field and click Change Label button.
Here are the paths where your newly located templates will be stored. * - is the name you gave to template while copy it.
/components/com_cobalt/views/records/tmpl/default_list_*/components/com_cobalt/views/records/tmpl/default_cindex_*/components/com_cobalt/views/records/tmpl/default_markip_*/components/com_cobalt/views/record/tmpl/default_record_*/components/com_cobalt/views/record/tmpl/default_comments_*/components/com_cobalt/views/form/tmpl/default_form_*/components/com_resource/views/form/tmpl/default_category_*Every template may have these files. Let’s for example take default_record_default.php template.
Then you may create files
default_record_default - folder that can store all additional files for your template. You have to use this folder if you want all needed files copied with Cobalt Packer.default_record_default.php - template file itselfdefault_record_default.css - put all template CSS here. It will be automatically linked. Note that it only make sense to create this file if you have more than 100 lines of css code. Otherwise <style> tag right in template would be enough.default_record_default.js - put all java script in this file and it will be automatically loaded. The same rule allies here. Only if you have some special JS object or library. Otherwise <script> tag inside template works perfectly.default_record_default.png - Small screenshot of your template to preview in template manager. The usually size is not more than 300x300px. But you may do it bigger. it is not required. You can add it if you want to distribute your template later on.default_record_default.xml - contain information of template author and template parameters. How to use parameters read in next chapter.For most effective template creation you may use template parameters. You may add your own parameters that may affect template style or field positions or make any other influence you want.
In default_record_default.xml - any template XML file you will find 2 parameter groups. Those are tmpl_params and tmpl_core. Here is the example.
<fields name="tmpl_params">
	<fieldset name="general">
		<field name="max_width" type="text" size="6" default="150" label="CSELCTMAXW" description="CSELWDESCR" />
			<field name="cat_ordering" type="list" label="CORDERING"  default="c.lft ASC">
			<option value="c.lft ASC">CORDERING</option>
			<option value="c.title ASC">CORDERNAMEASC</option>
			<option value="c.title DESC">CORDERNAMEDESC</option>
		</field>
		<field name="cat_descr" type="list" default="0" label="CTOOTIPDESCR" description="">
			<option value="0">CNO</option>
			<option value="before">CTOOLTIPBEFOR</option>
			<option value="after">CTOOLTIOPAFTER</option>
			<option value="full">CTOOLTIPFULL</option>
		</field>
	</fieldset>
</fields>
<fields name="tmpl_core">
	<fieldset name="general2">
		<field name="category_label" type="radio" label="CSHOWLABEL"  default="1">
			<option value="0">CNO</option>
			<option value="1">CYES</option>
		</field>
	</fieldset>
</fields>
You can create as many fieldsets in <fields name="tmpl_params"> as you want. Actually it is even good because it helps to keep your parameters organized and easy it to use.
You can add also description and label attributes to every <fieldset> like this
<fieldset name="general"
	label="main Parameters"
	description="Do not miss required parameters">
	// fields go her ...
</fieldset>
After you added parameters into template XML now you can access them in the template.
In every template parameters passed differently. I know it is not good. But sometimes there are 4 templates are loaded by the same view. To find how to use template params, look at the very beginning of template PHP file. In every core Cobalt template we initiate $params variable. Something like this
$params = $this->tmpl_params;
Or sometimes like this
$params = $this->tmpl_params['list'];
But it is always $params. This way you can learn how to initiate parameters object of your template. Just leave this line of code in the template.
You can use it n template now like this
<?php if($params->get('tmpl_params.item_icon_title')): ?>
	<?php echo JHTML::image($url);?>
<?php endif; ?>
Where tmpl_params of tmpl_params.item_icon_title the name of the parameters group and item_icon_title is the name of the field
<field name="item_icon_title" type="radio" label="Show icon title"  default="1">
	<option value="0">CNO</option>
	<option value="1">CYES</option>
</field>
There are slight differences and purses for every template. There are different article for different templates.
There is 2 ways of creating installation package. First is very simple. Just pack all files in to zip. If you pack few templates you may arrange files in to sub folders, but actually no matter how you packed them, installer will determine by name the purpose of the file and copy it to correct location.
This pack will be nice only to install thru template manager.
If you want your template pack to install through Joomla installer, then you need to read about how to create Joomla installer packages. This is beyond subject of this tutorial.
 MintJoomla Documentation